
'Schild en Vriend' is an old Flemish battlecry, used in the rebellion of the city of Brugge against the French, May 18, 1302. Legend tells that it was used to differentiate between the French-speaking (who could not pronounce 'schild') and Flemish-speaking citizens. Nowadays, historians tell us that it was probably 'Des Gilden Vriend'.

The following scratch-built terrain surfaces are discussed on this page:
Desert hexes
| Terrain data sheet: | ||
| Material | 2 cm thick expanded polystyrene sheet | 
|
| Dimensions | 6" hexes (point to point), about 150 of them | |
| Surface cover | Wall plaster | |
| Painting steps | 1 | |
| Builder | Bart Vetters | |
Construction
This was the first terrain I built, and I'll never do it again. It was originally built with the 1/300th WWII Western Desert games in mind, but has been used for many other games since. We currently use it to build hills on the desert tile terrain.
I cut out the hexes using a cardboard template and a standard 'snap-blade' knife. As this knife's blade is somewhat flexible, I angled the cuts inward to make sure any irregularities in the cut would not affect the fit of the hexes. This is easiest to see in this illustration (apologies for the rather amateurish drawing (-: ):
Of course, if you use only one of the two hill hexes created by cutting a full hex, e.g. only the ones with the top of the slope halfway down a side, you can still slope the cuts inward.
After the hexes were cut, I covered them with a layer of wall plaster, applied using a standard trowel knife (sp?). The plaster I used was from a hardware store and is normally used to plaster walls etc. to give them some relief. I laid on the plaster rather thickly so I could apply some texture to it by randomly drawing the trowel across it at different angles, and 'pulling up' the plaster by lifting the trowel briskly off the plaster (if that makes any sense). Roads, where needed, were scribed into the wet plaster with a simple cardboard template (my roads are 2cm wide). If you make sure you roads always enter and exit at the center of the hex sides, road hexes can be fitted together to form continuous road networks. I did several tens of road hexes like this, including turns, crossroads etc.
Painting
I went the easy way in painting these hexes. I just took some appropriately sand coloured paint (acrylic, again from the hardware store), thinned it down about 2:1 water:paint and applied it as a wash. This lead to most of the pigment collecting in the lower areas, and the white plaster lightening the higher areas, and turned out to be all that was necessary to get a somewhat good looking desert. So, the terrain was basically painted in a single step.
Final words
Although the terrain turned out quite well, I'll never do a small hex based homemade terrain again (well, never say never, but the chances are lower than those of penguins learning to fly) unless I can get the hexes cut perfectly straight somehow. Trying to cut them straight myself was too much trouble for me to ever try it again (not to mention the scars I still have on my fingers from when the blade slipped).
Desert tiles
| Terrain data sheet: | ||
| Material | 4 cm and 2 cm thick expanded polystyrene sheet | 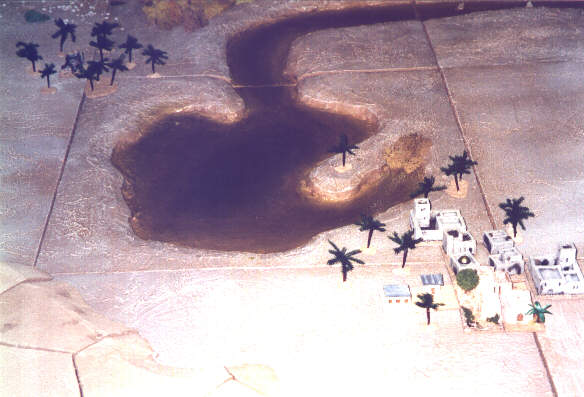
|
| Dimensions | 0.5m square tiles and 0.5m x 1m rectangular tiles | |
| Surface cover | Wall plaster | |
| Painting steps | 2 | |
| Builder | Bart Vetters | |
Construction
After the desert hexes, and faced with the desire to have a larger desert terrain to play on, I went the easy way on this one. Just for comparison: I spent maybe twenty or so hours on the hex desert terrain, while this terrain, although it is at least twice as large, only took me three or four hours at most (not continuously of course). Instead of fiddling around with knives and hot wires, I just used the polystyrene sheets the way I bought them: as one meter by half a meter rectangles. Only when I wanted more flexibility, as with the river, I used half this size (half a meter sided square).
The river and oasis / mud pool boards were built in two layers, using 2cm thick polystyrene sheet. The bottom layer was just a square polystyrene sheet, while the top layer had the river cut out in it. When these two boards were glued together (normal PVA glue), they ended up as a single 4cm thick board with a 2cm deep river running through it:
The oasis was created in the same way as the river boards. One of the river boards had a portion of its banks lowered to create a ford, and another one had small polystyrene bits glued in the river to make small 'islands'.
As with the hex terrain, the tiles were then covered with a layer of plaster. This was given some texture in the way described above and by using a piece of paper towel (kitchen paper) which was pressed into the wet plaster and then lifted up again, pulling the plaster up and leaving some texture. After a while, the kitchen paper picks up a lot of wet plaster, which makes the textures created like this different with every 'application' of the paper. Finally, railroad ballast and kitty litter was then sprinkled across some areas of the wet plaster to give extra texture.
The river beds and oasis were also given a plaster coat, but this was almost completely skimmed of using a trowel knife, leaving only a very thin layer of plaster. By always drawing the trowel in the same direction, 'stream lines' were created in this plaster layer which give the river floor some appropriate texture. Here and there, larger gravel stones (which I got from raiding the driveway of my parent's house - remember the first law of terrain building) were glued in the river bed. While the plaster was still wet, a few drops of white glue were applied behind the stones and islands in the riverbed, and these were sculpted with a cocktail stick to represent the churning stream patterns behind these obstacles. This limits some of the river boards in orientation (their rivers have to run in the same direction), but this is more than compensated by the added visual appeal IMO.
As I wanted to do this terrain quickly, I did not include any roads. I will make these seperately later. Hills are on the to do list for this terrain as well (I'll make them from polystyrene, just single hill shapes, not modular ones), but for now, we make do with using the desert hexes above as hills for this terrain (although there is a difference in colour between the two).
Painting
The dried terrain boards were then painted in a two step process. First, a basic (darkish) sand tone was painted all over the boards and sides (but not the river beds), and this was then liberally drybrushed (using irregular dabbing motions of the brush) with a light sand color. Obvious tip: use a large brush, this will speed up things tremendously (mine was 10cm wide).
The river beds and oasis were painted using blending techniques. I used two shades of brown: the basic shade of the terrain and an even darker shade, and on the oasis I used a third, nearly black shade as well. These paints were thinned down to a fairly watery consistency and were then applied on the river beds and blended in situ, with the lighter shades on the outside near the banks, and getting darker towards the middle of the river. Around the islands and in the curve, the same method was used to create the typical stream patterns for these features. After the paint was dry, I finally applied two coats of gloss polyurethane varnish (waiting for the first coat to dry before applying the second of course). The pot said the varnish was transparent, but it turned out to have a slightly brownish tint to it when dry, which helped the appearance of the river tremendously (a bit of luck there (-: ).
Western European tiles
| Terrain data sheet: | ||
| Material | Expanded polystyrene ceiling tiles Card | 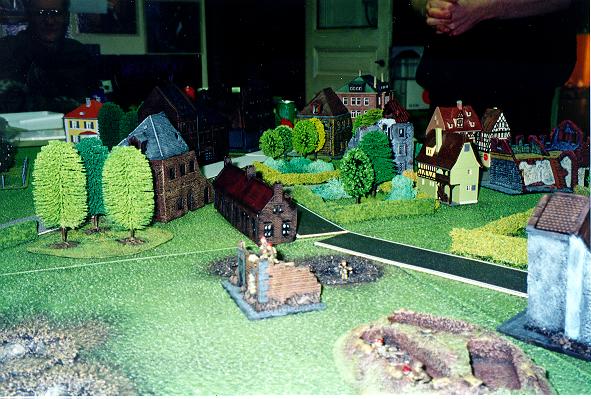
|
| Dimensions | 0.5m square tiles | |
| Surface cover | Wall plaster | |
| Painting steps | 4 | |
| Builder | David van Dijck | |
Construction
This terrain was not built by me (so that is probably the reason why it looks so much nicer than the other two (-: ), so I can't vouch for the accuracy of the following. I'll try to get David to write up a piece on building this terrain.
The tiles from this terrain were made by glueing four (I believe) polystyrene ceiling tiles one on top of the other. These tiles are available in most hardware stores and usually have some texture on them. The ones David used had a coarse grainy texture, so they were ideal to represent normal western European ground. To strengthen the sides of these tile stacks, David glued appropriately sized strips of heavy card to them.
After the basic boards were made in this fashion, David then attacked them with various tools to get some interesting features on them. The craters just visible in the above photograph were apparently carved using a kitchen knife, and had some small pieces of cork or model railroad ballast glued around the edges to represent dirt and debris. The roads on this terrain were scraped out using a flat trowel, and the swampy features which have miraculously failed to appear on any of the photographs on this site, were made using a similar technique as the one I used for the desert river boards.
The boards were then given a layer of some kind of plaster or filler (I believe it was a Polyfilla derivative of some kind - will check), but the boards were deliberately not covered completely, leaving some of the texture of the tiles themselves showing. As David is very much a detail freak, he then used a variety of cocktail sticks, pieces of model tank track and other such arcane instruments to add little details in the still wet filler such as road ruts and tank tracks. These features enhanced the close-up appearance of the terrain tremendously.
Painting
The boards were first painted black all over, and then drybrushed in succesively lighter tones of green, with irregularly shaped brown areas scattered about the boards to represent earth showing through the grass. The roads were painted in the same colours as the earth patches, but got a final drybrushing with a lighter sand tone to make them stand out more.
Final words
At last count, it took David in the region of close to a hundred hours to build this terrain. It turned out to be extremely pretty as a result, and he is very proud of it, as he should be, but it is still a very long time to build a base terrain surface. We find that with a lot less time and less precise methods we can build a somewhat less well looking, but still passable terrain surface. It's up to each individual to decide how much time he wishes to spend on building his basic terrain, considering the fact that there also have to be other scenery items built to complete the terrain setup, and, most importantly, there have to be figures painted to fight over the terrain. That said, whenever we do a game at a convention in the future, we'll probably take David's terrain if appropriate, because it is one extremely well-looking piece of work!
Home | This page is maintained by Bart Vetters Schild en Vriend Miniature Wargaming Club Leuven |